本帖最后由 1143097 于 2019-1-11 15:52 编辑
前言
本人咸鱼入手了小马路由V1后,CPU是N3700,内存和硬盘都被卖家升级到4G和64G,然后就有了后来的折腾之路。本文针对V1按照群内“液态蟒蛇”的视频安装好ESXi6.0u2的基础上进行的。液态蟒蛇的视屏非常详细,特此感谢!!如果你的CPU是N3150 N3160应该也是支持的,这里面的关键就是显卡螃蟹网卡8111E。文中提到的文件多数都在QQ群内有下载,只有一个文件是我自己制作的(ESXi-6.7.0-20181104001-standard-8111.zip)。所有的文件全部在下面网址下载:
正文最新测试进展,可以直接用ESXi-6.7.0-20181104001-standard-8111.zip升级,可以略过升级ESXi-6.7.0-8169922-standard-8111-xahci.zip的步骤,但是还是需删除一个不需要的驱动。
整体分两个阶段。第一阶段ESXi 6.0u2升级到ESXi-6.7.0-8169922,第二阶段从ESXi-6.7.0-8169922升级到6.7.0u1_build10764712。此升级步骤基本全部借助于某位网友的贡献,我只是把他实践了一下。升级过程都是通过zip包进行离线升级的。
阶段一:
1. 上传ESXI 的升级包ESXi-6.7.0-8169922-standard-8111-xahci.zip到ESXI存储,自己要记住上传的地方,后面会用到。 2. 进入控制界面,右击“管理”,选择“进入维护模式”。 3. 确认开启SSH(默认就开启了SSH,系统界面会有显示),使用SSH软件(工具包里面附带SecureCRT),并用root登录,密码就是lab123!@# 4. 在Shell里面分别运行下面命令以验证ZIP升级包,将下面命令的/vmfs/volumes/datastore/XXXX.zip换成自己存放的离线升级包的位置 - esxcli software profile get
- esxcli software sources profile list --depot=/vmfs/volumes/datastore/XXXX.zip
上面命令会返回一个profiles信息,也就是ESXi-6.7.0-8169922-standard-customized,自己记录下信息名字,后面会用到 返回信息如下: [root@localhost:~] esxcli software sources profile list --depot=/vmfs/volumes/ssd64/update/ESXi-6.7.0-8169922-standard-8111-xahci.zip
Name Vendor Acceptance Level
-------------------------------------- ------------ ------------------
ESXi-6.7.0-8169922-standard-customized VMware, Inc. CommunitySupported 5. 升级ESXI - esxcli software profile update --depot=/vmfs/volumes/datastore/XXXX.zip --profile=ESXi-6.7.0-8169922-standard-customized
(/vmfs/volumes/datastore/XXXX.zip为升级包存储路径 profile=ESXi-6.7.0-8169922-standard-customized为步骤4中查询到的profile信息的名字。 输完上面的命令会显示下面的出错信息,关键就在于下面的信息。 [root@localhost:~] esxcli software profile update --depot=/vmfs/volumes/ssd64/update/ESXi-6.7.0-8169922-standard-8111-xahci.zip --profile ESXi-6.7.0-8169922-standard-customized
[DependencyError]
File path of '/usr/lib/vmware/vmkmod/r8168' is claimed by multiple non-overlay VIBs: set(['VFrontDe_bootbank_net51-drivers_1.0.0-1vft.510.0.0.799733', 'Realtek_bootbank_net55-r8168_8.045a-napi'])
VIBs (Realtek_bootbank_net55-r8168_8.045a-napi, VFrontDe_bootbank_net51-drivers_1.0.0-1vft.510.0.0.799733) are conflicting with each other
File path of '/etc/vmware/driver.map.d/r8168.map' is claimed by multiple non-overlay VIBs: set(['VFrontDe_bootbank_net51-drivers_1.0.0-1vft.510.0.0.799733', 'Realtek_bootbank_net55-r8168_8.045a-napi'])
VIB VFrontDe_bootbank_net51-drivers_1.0.0-1vft.510.0.0.799733 requires vmkapi_2_1_0_0, but the requirement cannot be satisfied within the ImageProfile.
Please refer to the log file for more details. 出错:有些3方打包的安装包在新版的ESXI上不在继续支持,因此会报错,报错就是这个net51-drivers,我们需要在升级前用下面的命令删除这个废弃的螃蟹网卡8111E驱动。 - esxcli software vib remove -n net51-drivers -f
输出如下信息 [root@localhost:~] esxcli software vib remove -n net51-drivers -f Removal Result Message: The update completed successfully, but the system needs to be rebooted for the changes to be effective. Reboot Required: true VIBs Installed: VIBs Removed: VFrontDe_bootbank_net51-drivers_1.0.0-1vft.510.0.0.799733 VIBs Skipped: 6. 再次运行步骤5的升级命令 - esxcli software profile update --depot=/vmfs/volumes/ssd64/update/ESXi-6.7.0-8169922-standard-8111-xahci.zip --profile ESXi-6.7.0-8169922-standard-customized
这次输完命令后,就不会很快宝报错了。稍等几分钟会返回以下信息,实际内容很多,这里没有全部列出来。关键看见里面的successfully [root@localhost:~] esxcli software profile update --depot=/vmfs/volumes/ssd64/update/ESXi-6.7.0-8169922-standard-8111-xahci.zip --profile ESXi-6.7.0-8169922-standard-customized
Update Result
Message: The update completed successfully, but the system needs to be rebooted for the changes to be effective.
Reboot Required: true
VIBs Installed: Realtek_bootbank_net55-r8168_8.045a-napi, VFrontDe_bootbank_sata-xahci_1.39-1, VMW_bootbank_ata-libata-92_3.00.9.2-16vmw.670.0.0.8169922, VMW_bootbank_ata-pata-amd_0.3.10-3vmw.670.0.0.8169922, VMW_bootbank_ata-pata-atiixp_0.4.6-4vmw.670.0.0.8169922,
.....................................
升级后第一次启动,比较慢,可能大概5-10分钟。不出问题的话,应该就能进网页控制端了。6.7不再支持VMware vSphere Client登陆
阶段二:
这个阶段就是依葫芦画瓢,只是将离线升级包换成我制作的ESXi-6.7.0-20181104001-standard-8111.zip。 现在6.7同版本升级就没有net51-drivers这个驱动捣乱了。简单步骤描述如下:
1. 上传ESXI 的升级包ESXi-6.7.0-20181104001-standard-8111.zip到ESXI存储,自己要记住上传的地方,后面会用到。
2. 进入控制界面,右击“管理”,选择“进入维护模式”。
3. 确认开启SSH(默认就开启了SSH,系统界面会有显示),使用SSH软件(工具包里面附带SecureCRT),并用root登录,密码就是lab123!@#
4. 在Shell里面运行下面命令以验证ZIP升级包,修改/vmfs/volumes/datastore/XXXX.zip你自己存放的离线包的位置
- esxcli software profile get
- esxcli software sources profile list --depot=/vmfs/volumes/datastore/XXXX.zip
5. 升级ESXI
- esxcli software profile update --depot=/vmfs/volumes/datastore/XXXX.zip --profile=ESXi-6.7.0-20181104001-standard-customized
6. 进入控制界面,右击“管理”,选择“进入维护模式”,然后选择“重新引导”来重启ESXI主机。
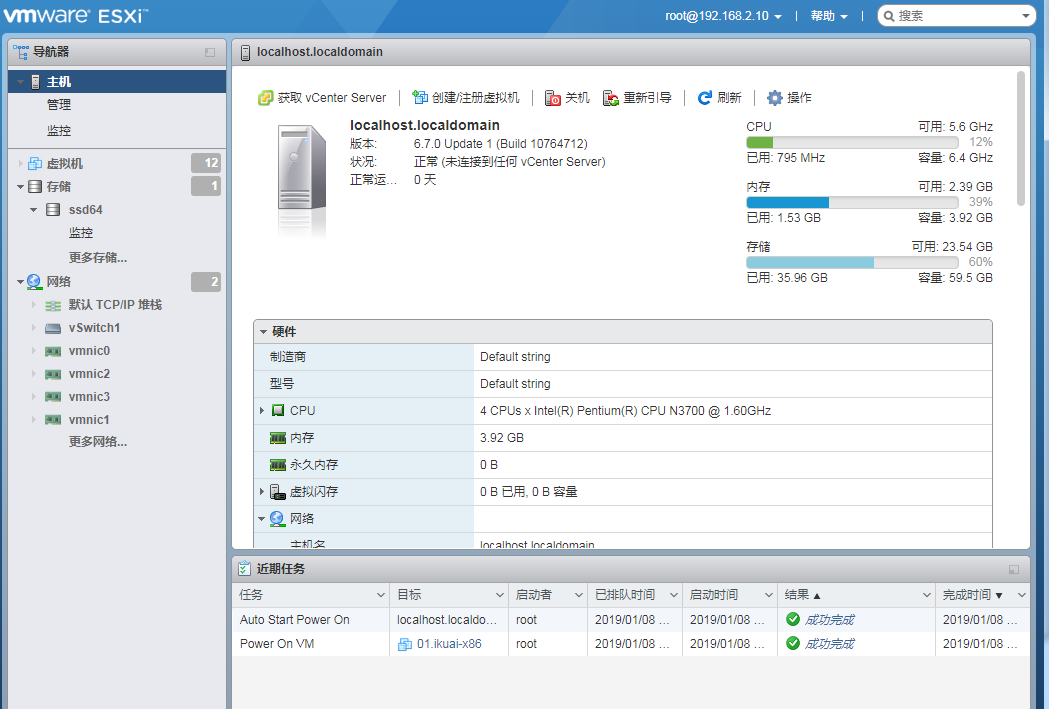
最后附上一张成功后的截屏。

题外话:
本人也是参考了参考文献1和3里面的链接制作的这个离线升级ESXi-6.7.0-20181104001-standard-8111.zip包。
有问题请回帖,我有空会尽量回复。
BTW:其实电脑VMware Workstation Pro制作的基于workstation 14.x的虚拟机导出的文件ova vmdk等都可以导入到ESXi6.7里面。
制作的截图如下:

参考文献:
http://koolshare.cn/thread-138068-1-1.html
https://vibsdepot.v-front.de/wiki/index.php/List_of_currently_available_ESXi_packages
https://www.v-front.de/p/esxi-customizer-ps.html
|  |Archiver|手机版|小黑屋|小马机箱、软路由、X86电脑、NAS、HTPC、
( 粤ICP备14061825号-2 )